
Hi and welcome! Thanks so much to Mayya of Sew Chic and Unique for having me be a part of Inspire to Create. Sewing is a HUGE part of my life. I sew to relieve stress, to keep my mind active, to be part of a large and wonderful online sewing community, and also as a way to earn a bit of money while staying home with the kiddo. I can't put my finger on any one thing as my source of inspiration - that can change from one moment to the next. Necessity is often a factor. I find myself looking at the insides of clothes when I'm out shopping to see how things are put together. I can spend hours in a fabric store waiting for ideas to pop into my head. Sometimes ideas start with something as simple as a pretty button. I'm always looking out for interesting color or pattern combinations. Etsy, Flickr, and craft/sewing blogs are all great places for ideas. I pretty much learned everything I know about sewing from all the awesome craft/sewing bloggers out there who are willing to share their know-how. I hope some of you out there will find my tutorial useful and that maybe you'll learn something new!
Although I love creating sewing tutorials, sometimes I need a little
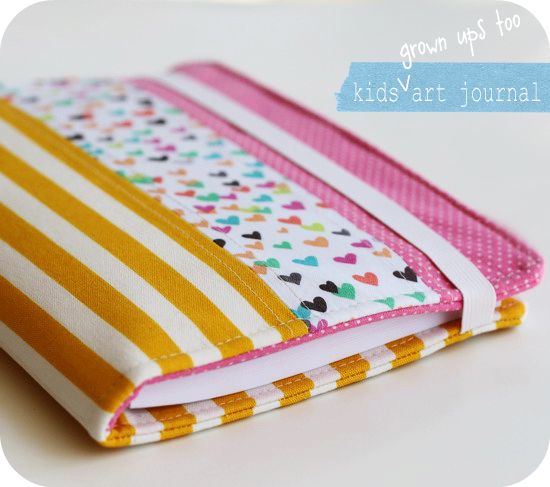
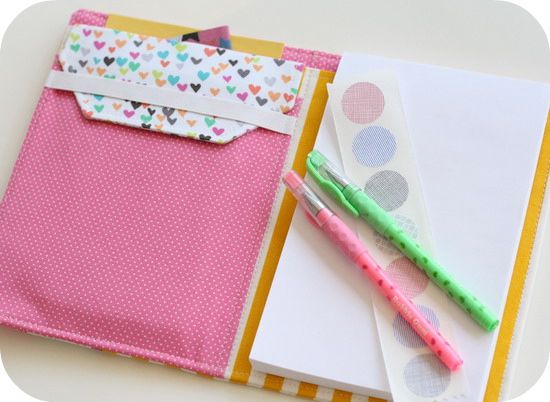
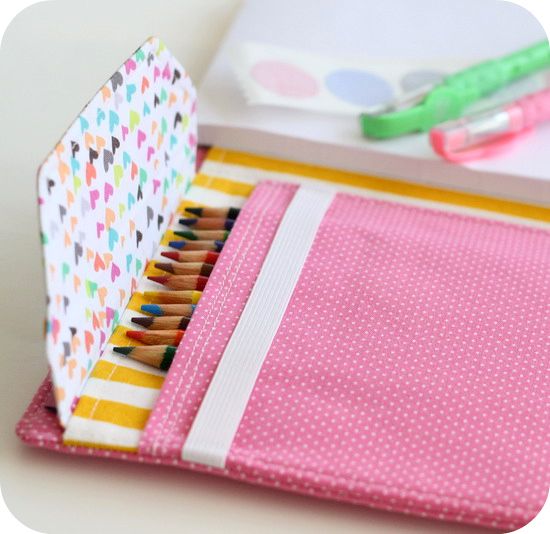
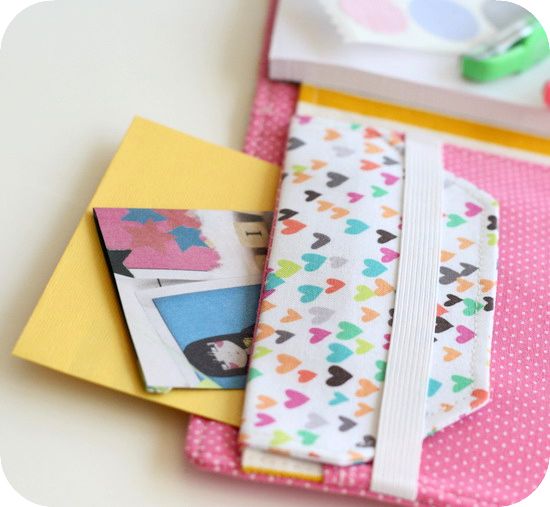
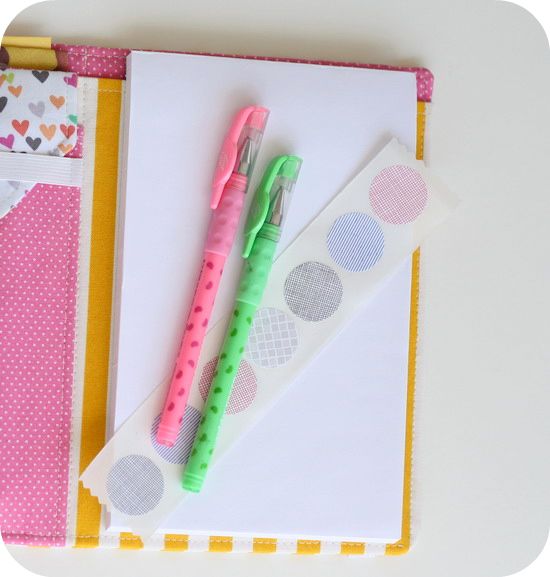
This art journal is perfect for just about anyone who likes to draw or write on the go. Get creative and personalize it. Make a few and give as gifts! It has several pockets for holding a paper pad, lots of pens and pencils, and also for stashing artwork, notes, stickers, etc. I used elastic as the closures for both the pencil pocket flap and the art journal itself.
Supplies needed:
- fabric (1/2 yard or so of various prints)
- Heavyweight fusible interfacing (Pellon Craft Fuse)
- 1/2 inch elastic
- cotton batting
- thread
- size 16 or 18 needle
- rotary cutter/mat/ruler
- scissors
- hand sewing needle
- 5 x 8" scratch pad or junior legal pad
- a walking foot is helpful if you have one!
- fabric marking pen
Skill Level: Advanced (or Adventurous) Beginner and up
A note on fabric: I just knew I wanted to create this art journal/pencil holder using the yellow Ikea stripe fabric I had left over from this project. Well, that fabric is rather heavyweight. Kinda hard to work with when using several layers. I would probably stick to using quilting cotton for this project. Unless you're just crazy like me ;) If you do choose to use a heavier weight fabric, maybe leave out some of the interfacing. Just sayin'.
Make sure to read through the entire tutorial before starting!
Cut the following from your:
Fabric
{2} 9.5" x 13.5" (exterior fabric and lining)
{2} 8.75" x 13.5" (large pocket piece and lining)
{1} 15" x 7.25" (pencil pocket piece, will be folded in half)
{2} Flap - pattern piece here {please email me if you have issues downloading}
Interfacing
{2} 8.5" x 12.5"
{1} 7.75" x 12.5"
{1} 6.25" x 7"
{1} Flap - pattern piece here
Batting
{1} 9.5" x 13.5"
Elastic
{1} 9.75" long (*this gives a pretty snug fit. if you want the elastic a bit looser, go with 10")
{1} 7.25" long
Next, fuse interfacing:
Center the interfacing on both your 9.5" x 13.5" pieces and fuse.
Center the interfacing on the outer large pocket piece and fuse.
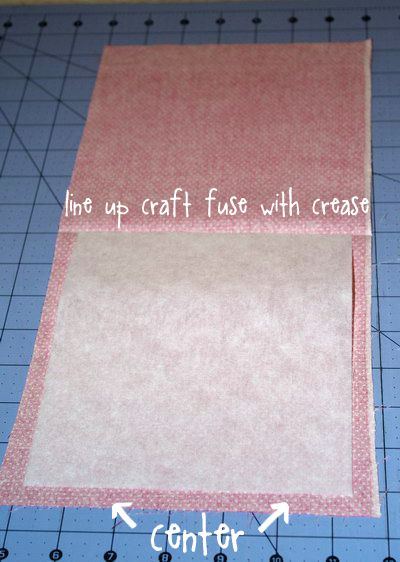
Fold your small pocket piece in half to create a 7.25" by 7.5" piece. Press, open the pocket and line up your interfacing with the crease and center. Fuse. If you are using a directional print, keep in mind that you will want the interfacing fused to the side that will be facing out.
For the flap, use the pattern piece to cut out one piece of interfacing. Trim the interfacing a bit to reduce bulk in the seam allowance. Fuse.
*If you've never worked with Craft Fuse before, here are a few tips:
- use a hot, dry iron
- iron directly on the interfacing
- start in the center and work your way out to the edges
- use a bit of pressure, but not too much as it can stretch your fabric out
- if you get a wrinkle/crease in your fabric, spray a bit of water and smooth it out
- finish off by flipping the piece over and pressing the other side
Let's get to sewing! Use a 1/2 inch seam allowance throughout the project.
Step 1 - Making the Flap
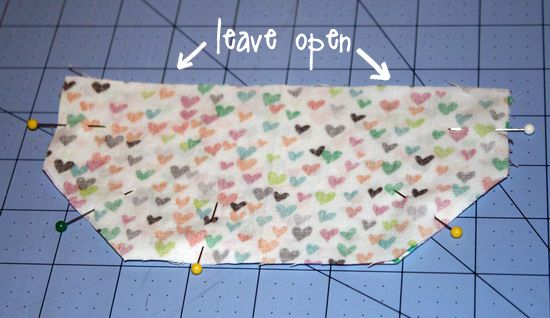
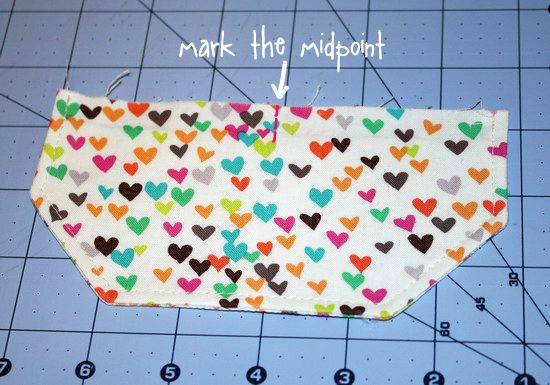
Place your flap pieces right sides together and sew, leaving the top open for turning. Trim the corners and turn the flap right side out. Press! Top stitch your flap to give it a finished look. Don't worry about the unfinished top-it will be sewn into the large pocket. Fold the flap in half width-wise to find the center and make a small mark at the top.
Step 2 - Large Pocket Piece
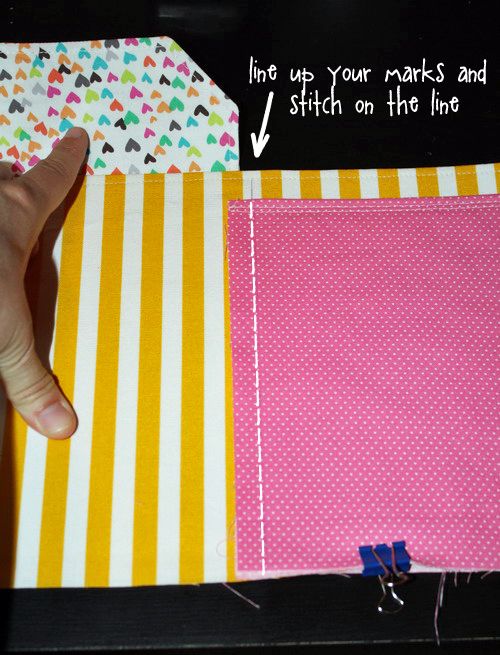
Grab one of your large pocket pieces (the one without interfacing) and lay it on your cutting mat. From the left, measure in 10 inches and make a small mark at the top of your piece. Now, match the mark on your flap to the mark you just made on the pocket piece. Line up the raw edges of the flap to the edge of the pocket piece and baste.

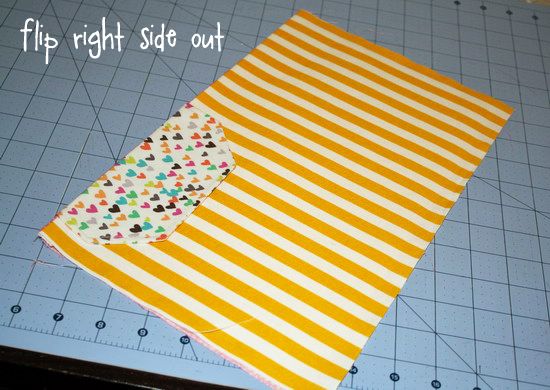
Next, layer the other pocket piece (with interfacing) face down on the piece with the flap attached. Sew the 2 pieces together along the top long edge. Press open the seam allowance and flip your pieces right sides out. Your flap should now be on the right side of the pocket piece. With the flap lifted up and out of the way, press again, and then top stitch along the length of the pocket piece.


Step 3 - Pencil Pocket
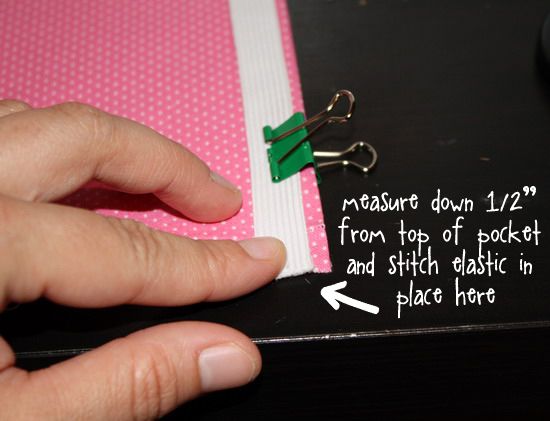
Get your shorter length of elastic and pencil pocket piece (PPP). Making sure the interfaced side of the PPP is on top, lay your elastic down 1/2" from the top. Sew into place on the right side 1/4" from the edge. Flip the PPP over so that the elastic is facing down. Draw your 1/2" seam allowance along the left side of your PPP.
{The elastic is obviously not 1/2" down from the top in the photo below. Oops!}
Just pretend it is ;)
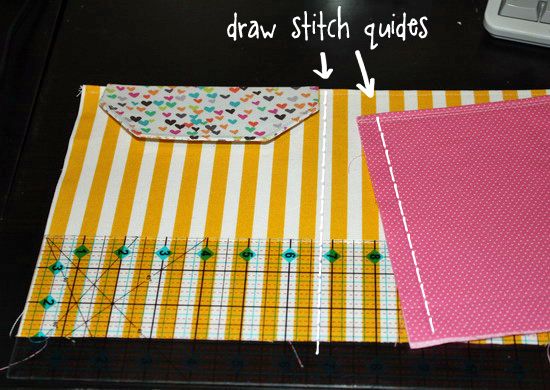
On your large pocket, measure in 6.75" from the left and draw a vertical line the length of the piece. Place your PPP on the right side of the large pocket, matching up the 2 lines you just drew. You'll want the bottom raw edges to match up as well. Sew along the line to attach the PPP to the large pocket.
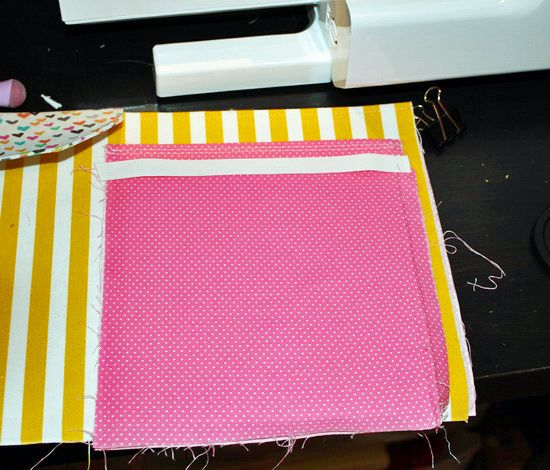
Flip the PPP over to the left and press. Smooth the elastic down without stretching and sew into place on the left side (1/2" from the pocket top). Baste the pocket into place along the left side and bottom. Lift the flap up and out of the way, then top stitch along the right edge of the PPP (sew over the elastic).

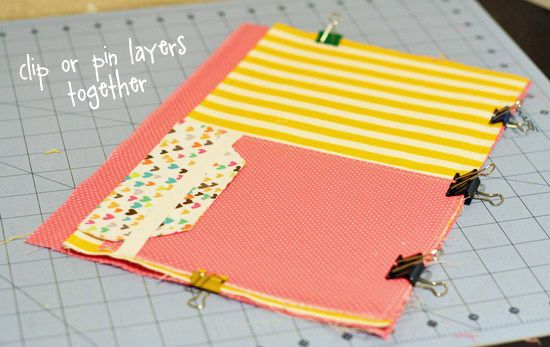
Step 4 - Attach Pockets to Lining
Lay your completed pockets on top of your lining. Align the raw edges along the bottom and left/right sides. Pin into place and baste. The raw edges of the pencil pocket may not match up perfectly with the left edge of the of the lining piece as you can see in the photo above. That's ok! As long as it falls within the 1/2 inch seam allowance, it will work out. That's why I like using a 1/2" seam allowance-leaves you a bit of wiggle room.
*I like to use small binder clips in place of pins on projects with lots of layers.
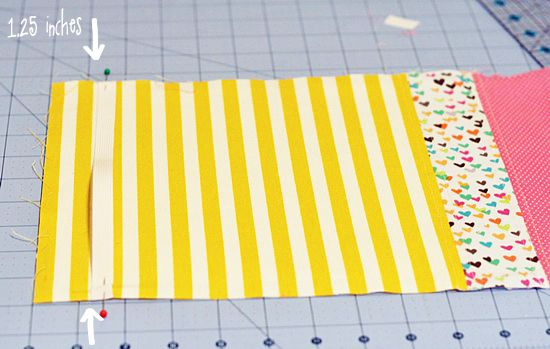
Step 5 - Attach Elastic Closure
To attach the longer piece of elastic to the exterior fabric, measure in 1.25" from the left edge and mark. Sew the elastic on at the top and bottom of the exterior fabric piece, about 1/4" from the top/bottom edges. You will have some slack in the elastic.
Step 6: Almost Finished!
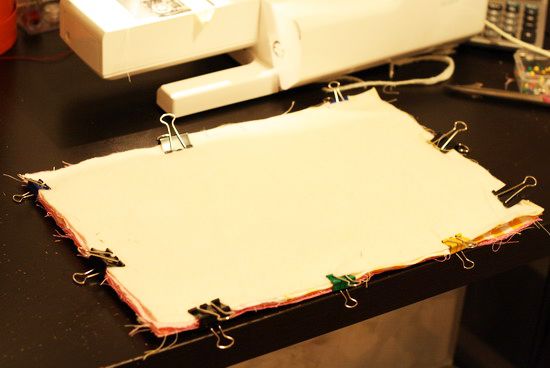
With your lining/pocket piece face up, layer your exterior piece on top face down, and then place your batting on top. Pin or clip your "sandwich" together. Sew all around your sandwich, leaving a 5" opening for turning at the top right portion. As you sew, you may need to trim the batting a bit as it stretches so you can clearly see the edges of your exterior fabric to use as a guideline.
Once your art journal is sewn together, trim the batting almost to the stitch line, and trim the corners. Turn right side out. A word of warning. . . your art journal is going to look like a hot mess. You're going to really need to press it with a hot, steamy iron to flatten and smooth things out.
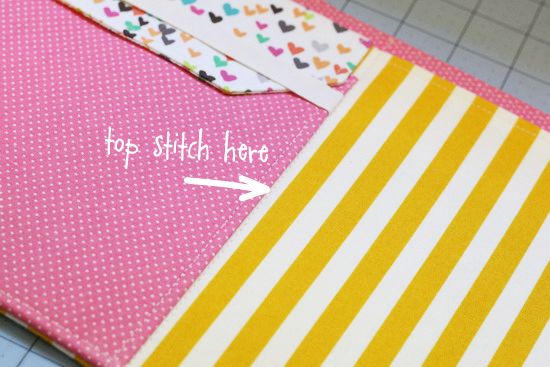
Once you've pressed the journal into submission, slip stitch shut the opening you used for turning. Next, top stitch right along the right edge of the pencil pocket to create 2 pockets - one for your paper pad to slip into and one for artwork, etc. Finally, top stitch around the edges of the art journal. It will be a little tricky working around the elastic but you can do it!
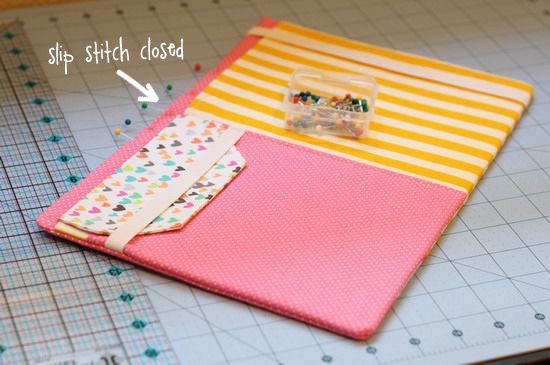
All done!
I would LOVE to see photos of your creations. Make sure to add them to LBG Studio Flickr group so we can all check them out.
This tutorial is for PERSONAL use only. Please do not sell items made using this tutorial. Thanks!
If you are interested in purchasing a license to sell items made from this tutorial, go here!
Happy sewing!
Yay, great job Vanessa! This project is so cute and your pictures are great too! I love that heart print you used for this - I've (barely) resisted buying that one a couple times :-)
ReplyDeleteHooray for another great tutorial! Now get some sleep!!!
Vanessa, I love it! So cute and looks pretty simple too. I can't wait to make one:) Thanks for sharing!
ReplyDeleteWow! I want that :)
ReplyDeleteLovely blog!
ReplyDeletePlease visit my blog - I'm starting a Christmas Craft class soon:
http://greenpicklesblog.blogspot.com/2010/09/christmas-craft-class.html
Love
Aimee
x
Do you sell these in your shop? I want one just like that and I am not even a beginner seamstress! Let me know. Thanks!
ReplyDeleteYour blog is too cute! I don't know how I ended up here exactly, but I'm so glad I did :-). I have a craft blog and etsy shop too (and I have two little girls). Love all your girly posts....right up my alley.
ReplyDeleteHope you are having a great day,
Lindsay
I just saved this page... I LOVE this tutorial, I am a huge sucker for gifts for kids! I love that this is a very boy friendly gift as well! I have such a hard time finding cute things to make for my little boys. Thank You for this tutorial!!
ReplyDeletelove it vanessa!!! this is really a great tute, you're always so thorough. the fabrics are fab!
ReplyDeleteThis is so adorable! This is by far one of the cutest paper and pencil holder things (that's what you call them right? :o) ) I have seen. I love the fabric combination you chose. Thanks for sharing it with us!
ReplyDeletebeautiful job! Love the fabric combos. this is going to make some young artists happy!
ReplyDeleteSuper cute and very clear! You always make the cutest things!
ReplyDeleteAwesome! I love all the pockets!! I linked to your tutorial at Craft Gossip Sewing:
ReplyDeletehttp://sewing.craftgossip.com/tutorial-art-journal-for-kids-and-grownups-too/2010/09/26/
--Anne
I love this!
ReplyDeleteI have twin nieces that are having a birthday soon and this would be so cool for them. A HUGE thank you for taking the time to write out the directions and taking great pics along the way for this tutorial for all us visual people out here!
ReplyDeleteP.S.
Loving the camera strap tutorial with the pockets as well. : )
beyond adorable!
ReplyDeleteThanks for the great tutorial! I posted a link and my finished product on my blog here: http://culdesacmom.blogspot.com/2010/12/top-10-projects-from-online-tutorials.html
ReplyDeleteI made this beautiful journal and I like it. Thx 4 the tutorial :D
ReplyDeleteWonderful idea, great tutorial, beautiful fabrics! Thank you!
ReplyDeleteOh my! I love this! Great tutorial. Thank you for taking the time to share it with us.
ReplyDeleteSo nice idea!! I included it in my blog http://creationsbyzoe.blogspot.gr/
ReplyDeleteand it will appear on July 28, helping inspire Greek crafters for those little pretty things!!! Thanks a lot!!
AMAZING TUTORIAL!!!!!
ReplyDeleteMany Thanks ; )
Carine
I want to get the template that you need for the pocket and it would not let me print it? said i had to join for $9.00. I love this tutoiral and would love to make one for my little girl for christmas. do you think you can send me the template. thanks Bonnie
ReplyDeleteswapping4fun@yahoo.com
I want to get the template that you need for the pocket and it would not let me print it? said i had to join for $9.00. I love this tutoiral and would love to make one for my little girl for christmas. do you think you can send me the template. thanks Bonnie
ReplyDeleteswapping4fun@yahoo.com
Great tutorial, I have just made 4 for Christmas gifts and they took no time at all! I will add my photos to the group sooon.
ReplyDeleteI love this! BTW, we have the same exact machine! For some reason the somewhere out there song popped into my head. :)
ReplyDeleteWhere did you get the plain pad of paper?
ReplyDeleteA great christmas gift for my grand kids.. I have encouraged them all to write..diary, stories, whatever..just write. And the 2 older ones have and the one boy loves to draw so this will be great for him too and tehe two youngest...this will be a great intro for them! Thanks for the instruction. I was wondering to...anyway to print the instructions out so I am not running back and forth from PC to sewing machine (opposite ends of the house!)?
ReplyDeleteThank you for the tutorial. I used it to make a Christmas gift for my stepsister who loves to draw, and it turned out pretty cute. I did want to mention a few parts of the directions I felt could use a bit more explanation.
ReplyDelete1. When you advise to fold the pocket piece to create a 7.25" by 7.5" piece, and then interface it, I was confused if I was supposed to apply the interfacing to the 7.25 or 7.5 side. I read through the rest of the tutorial and never really saw you make mention of the 7.25 or 7.5 side again, so I actually ended up just folding my pocket exactly in half, thinking this would be the safest thing to do. I don’t think this caused any issues, but I think the tutorial could use some explanation as to why the halves are different, and details as to how you should position the 7.25 side versus the 7.5 side. I feel like this contributed to part of my issue in #3?
2. I was pretty confused by which fabrics applied to which pattern pieces, since the front of your journal actually showed all three, but then the directions for the cover appeared to be just for one fabric. I actually wanted just one fabric for the outside, but since yours showed multiple, I had to read and re-read to see how to make the change to just one, before finally realizing the tutorial called for just one outside fabric. Maybe it would help to suggest how many fabrics should be used, and term them “Fabric A”, “Fabric B”, etc.? And maybe specify that you could piece together different fabrics to equal a pattern piece, which was what you did for the front of the journal, but wasn’t actually specified in the instructions? I ended up only using two fabrics, keeping my outside/pocket flap as Fabric A, and then my lining/large pocket piece as Fabric B, but it seriously took me forever to figure out for some reason.
3. Once I had filled my journal in with pencils and paper, it seemed that there wasn’t enough “middle” to actually fold the journal in half properly. What I mean is that my pocket turned out to be the same width as the part I put the paper in, so they could fold in half easily when they were empty. But once I put stuff in, I found I needed extra “middle” to create almost like a book spine so that when full, the book edges would still line up well.
Anyway, I will say that I’m mostly an apparel sewist, not a crafter, so it's likely that these mistakes were just me screwing up, but thought I would share my thoughts in case others may be having the same issues. If any of this was confusing or you have other questions, you can email me at nicolemorgan86 AT gmail DOT com.
I experienced very similar issues as these listed. I was also wondering if it was necessary to have it so thick?? I am just finishing up so not sure how it will all work out.
DeleteLoved this idea though!!
Thankfulness to my dad who informed me relating to this blog, this website is really amazing.Butterfly Pouches
ReplyDelete