

I'm sharing a fun tutorial with you today - how to add some pretty personalization to a zipper pouch! I made one for Sydney as part of her school supplies since I wasn't loving the vinyl pouches available at stores. It is one the larger size so that it can hold more stuff! This is a fairly simple project but does take a bit of time - really depends on how long of a name/word you plan to use as well as the size and type of font you choose. I realize tutorial may make it seem like a long, convoluted process because I probably over-explain things but it's really not! Promise.
Materials |
small colorful scraps of fabric
package of Heat and Bond light or your preferred brand of fusible web*
small sharp scissors
pencil
pencil
main fabric
lining fabric
applique foot (optional)
applique foot (optional)
fusible interfacing (optional)
9" or longer zipper (I prefer to use 12" inch or longer zips for ease of sewing)
short length of ribbon, twill tape, or leather lacing for zipper pull
Photoshop, Elements, Illustrator, Word, etc for creating letters
*I prefer to use a fusible web that I can sew through. If you prefer not to sew, choose a no-sew, permanent fusible web such as Heat N' Bond Ultra
*I prefer to use a fusible web that I can sew through. If you prefer not to sew, choose a no-sew, permanent fusible web such as Heat N' Bond Ultra
Cut |
main fabric (2) 9.5" wide x 6" tall
lining fabric (2) 9.5" wide x 6" tall
interfacing (2 or 4) 8.5" wide x 5" wide*
*for a sturdier pouch, fuse interfacing to both the main fabric pieces and the lining pieces
Create letters |
If you're already familiar with Photoshop or Illustrator, this is super simple and takes only a few minutes to do.
If you're already familiar with Photoshop or Illustrator, this is super simple and takes only a few minutes to do.
Since I want to be able to visualize what the finished pouch will look like and determine the size and placement of the letters, I create a mock up using Photoshop to print out. I can then use the print out to trace the letters I plan to applique onto the pouch. Any program that allows you to work with text will work. The general idea is to create a shape that will the same size as your finished pouch and use that as a guideline for choosing a font and determining the size and placement of the text you plan to applique.
Step 1 - Create A New Document
File -> New
Enter finished pouch dimensions in inches at 100 DPI (8.5" x 5")
You'll now have a file that is the finished size of your pouch. This is the method I used in Photoshop CS5.
The newer versions of Photoshop - 6 and CC, allow you to create a shape with specific dimensions. In that case, another option is to create a file the size of US Paper (8.5" x 11") or whatever your preferred paper size is and then create a rectangle on that document with the correct dimensions. The screenshot below shows the first method.


Next you'll want to add text to your document using the text tool. I like to use black for the text color to make it easy to trace. Also, it is helpful to open the Character window so that you can quickly make adjustments to the text such as changing the font, size, and spacing.
A few notes on fonts. . . choose a font that is either already on the chunky side or a font with a bold option. An extremely thin font will be hard to cut out and a nightmare to sew. The font I used is Coolvetica. Also, you don't want to use too small a font for similar reasons. A few sources for free or low cost fonts:

Go to: Edit menu -> Transform -> Flip Horizontal

A few notes on fonts. . . choose a font that is either already on the chunky side or a font with a bold option. An extremely thin font will be hard to cut out and a nightmare to sew. The font I used is Coolvetica. Also, you don't want to use too small a font for similar reasons. A few sources for free or low cost fonts:
So now that you've got your text sorted out the next thing you'll want to do is reverse it. You'll be tracing the letters backwards so that when you fuse the Heat N' Bond to your fabric, the adhesive will be on the back of the letters.
Go to: Edit menu -> Transform -> Flip Horizontal
Print this out and we'll move on to the next step!
Trace, Cut, Place, and Fuse Letters |
Cut out a piece of the Heat N' Bond large enough to trace each letter while allowing for extra space between each letter. Using a pencil, carefully trace each letter onto the Heat N' Bond (smooth side). Then cut out each letter leaving some space around them. Choose a fabric scrap for each letter and following package directions, fuse the letters to the wrong side of the fabric scraps.

Next, choose a fabric scrap for each letter and fuse the letters to the wrong side of the scraps following the Heat N' Bond package directions. Allow them to cool and then very carefully cut out each letter. This is were having small, sharp scissors will come in handy. Once they are all cut out you can peel off the paper backing.

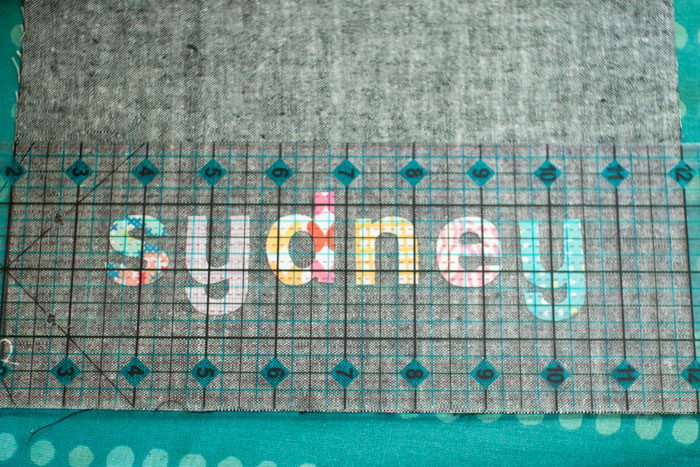
Now it's time to place the letters onto the front outer fabric piece and fuse them. I like to use my large quilting ruler to help make sure my letters are evenly spaced and I use my print out as a placement guide. It's probably a good idea to do all of this on your ironing board so that you don't have to move anything before you get those letters attached.
Once you've fused on the letters you'll need to stitch around each letter unless you've used a no-sew fusible web. If you have an applique foot, attach it to your machine as it will make it easier to sew around the letters. I use a shorter stitch length as well. Go slowly and leave your needle down any time you need to shift the fabric. While stitching around small curves, I lift the presser foot and shift the fabric after every stitch or two. I don't make any major attempts are perfect stitching here - using a neutral color thread helps to keep the stitching less visible. Trim threads or use a needle to pull them to the wrong side of the fabric and tie off.


Pouch Assembly |
If you're a zipper pouch pro then you've got this! If not, here is a quick rundown:
1/2 seam allowance
If you haven't already, fuse interfacing to your fabric pieces if you plan to use it. The interfacing is cut smaller than the fabric to reduce bulk in the seams so just center it onto each fabric piece and fuse.
Place the front piece of your pouch right side facing up. Your zipper goes next - face down, with the zip pull on the left side. I like to baste the zipper in place at this point but that is optional. Place one of your lining pieces face down on top of the other two layers and pin or clip in place. Make sure the top edges of all three line up, as well as the side edges of the two fabric pieces. With a zipper foot, sew 1/8" to 1/4" away from the zipper teeth. Flip both the outer fabric and the lining around and press the fabric away from the zipper.


remaining lining piece right side up, the half pouch you've already sewn right side up, remaining outer piece right side down. Line up all the pieces along the top and side edges and pin or clip in place. Again, sew about 1/8" to 1/4" away from the zipper teeth. Flip the fabric around so that you have a lining and outer piece on either side of the zipper. Press the fabric away from the zipper. Switch over to a regular machine foot and top stitch close to the zipper on both sides using a longer stitch length.
Once you've fused on the letters you'll need to stitch around each letter unless you've used a no-sew fusible web. If you have an applique foot, attach it to your machine as it will make it easier to sew around the letters. I use a shorter stitch length as well. Go slowly and leave your needle down any time you need to shift the fabric. While stitching around small curves, I lift the presser foot and shift the fabric after every stitch or two. I don't make any major attempts are perfect stitching here - using a neutral color thread helps to keep the stitching less visible. Trim threads or use a needle to pull them to the wrong side of the fabric and tie off.
Pouch Assembly |
If you're a zipper pouch pro then you've got this! If not, here is a quick rundown:
1/2 seam allowance
If you haven't already, fuse interfacing to your fabric pieces if you plan to use it. The interfacing is cut smaller than the fabric to reduce bulk in the seams so just center it onto each fabric piece and fuse.
Place the front piece of your pouch right side facing up. Your zipper goes next - face down, with the zip pull on the left side. I like to baste the zipper in place at this point but that is optional. Place one of your lining pieces face down on top of the other two layers and pin or clip in place. Make sure the top edges of all three line up, as well as the side edges of the two fabric pieces. With a zipper foot, sew 1/8" to 1/4" away from the zipper teeth. Flip both the outer fabric and the lining around and press the fabric away from the zipper.
You'll repeat the process for the other side of the pouch. Layer pieces in this order from bottom up:
remaining lining piece right side up, the half pouch you've already sewn right side up, remaining outer piece right side down. Line up all the pieces along the top and side edges and pin or clip in place. Again, sew about 1/8" to 1/4" away from the zipper teeth. Flip the fabric around so that you have a lining and outer piece on either side of the zipper. Press the fabric away from the zipper. Switch over to a regular machine foot and top stitch close to the zipper on both sides using a longer stitch length.


Almost finished! First, open the zipper up part way so that you'll be able to turn things right side out at the end. Then flip the sides around until you have lining pieces on one side and outer pieces on the other - rights sides touching. Make sure your zipper teeth are facing the lining!!! If necessary, use a ruler and cutting mat to square things up before sewing the pouch together. You can trim the zipper now or after you've sewn the pouch together. Pin. Sew around the sides of the pouch, making sure to leave an opening on the bottom of the lining. Trim the corners, zipper, and seam allowance and then turn the pouch right side out. Push the corners out gently with a something pointy and press the entire pouch well. Hand or machine sew closed the opening in the lining. All done!

This is just adorable! I love the linen and the colors you chose. I might be inspired to make one of these.
ReplyDeleteSo cute. Aren't Wonder Clips the best?
ReplyDeleteSo cute!!
ReplyDeleteThis is so adorable! I need to get some Wonder Clips...
ReplyDeleteSydney has the coolest pencil case in the school, I"m sure! Love the personalization of this. Thanks for taking the time to write a tutorial!
ReplyDeleteReally cute!
ReplyDelete