
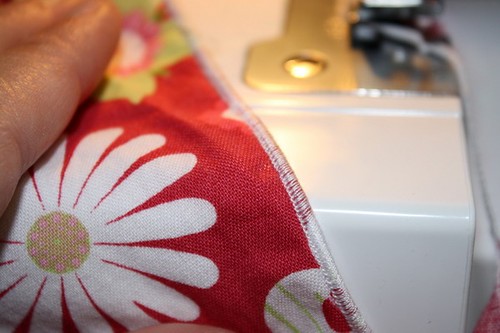
Several of you mentioned that my serger gathering tutorial was helpful so I thought I'd post a how to for rolled hems. This one is a bit trickier than gathering but hopefully the photos will help. The settings I used are probably more of a guideline as they may need to be changed depending on what type of fabric or thread you are using. I used a quilting weight cotton for this demo. A quick note-until I attempted to figure out how to do a rolled hem, I hadn't actually threaded my machine. I used the cheater method of tying my new thread onto the thread the machine came with. I was forced to start from scratch when I broke thread several times during my testing phase. It really wasn't that bad!! I used the handy orange booklet that came with the serger along with the nifty diagrams on the machine, crossed my fingers, and hoped for the best. So, be prepared to rethread your machine from scratch while playing around with rolled hems!
You will need:
*scrap fabric that is the same weight as the fabric you plan to use (do some testing on the scraps before starting on your project)
*regular serger foot
*standard serger thread / Woolly Nylon/Polyarn (more on that below)
First, we'll set the machine up to use one needle only. Using the little allen wrench that came with the machine, loosen the needles while holding them. As they loosen, pull out the left needle, then tighten the right needle into place.

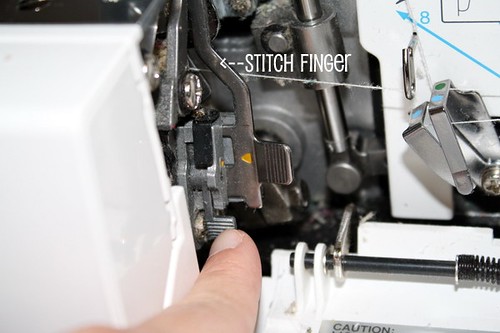
Next, you'll need to remove the stitch finger. Start by lifting the presser foot up. Pull all threads to the back. Turn the wheel until the upperlooper is at the lowest position as in the photo. Press the little lever at the base of the stitch finger and pull it out using the tab next to the orange arrow.


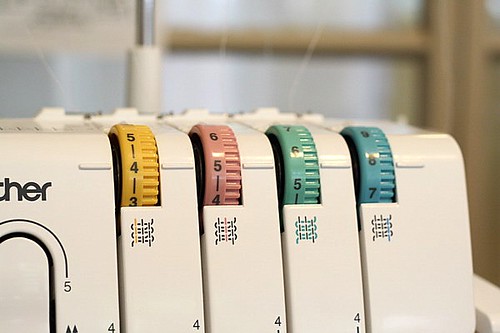
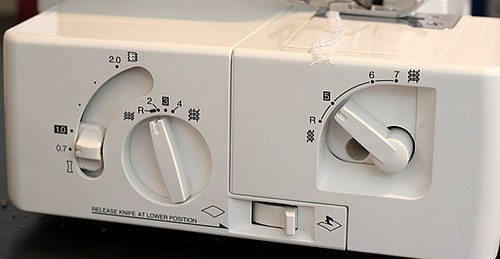
Dial your machine to the following settings:
(remember, you may need to tweak these settings to get the best results)
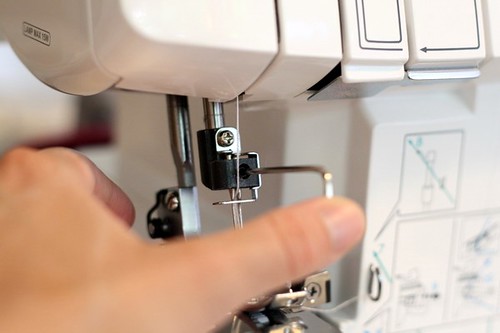
Next, you'll need to remove the stitch finger. Start by lifting the presser foot up. Pull all threads to the back. Turn the wheel until the upperlooper is at the lowest position as in the photo. Press the little lever at the base of the stitch finger and pull it out using the tab next to the orange arrow.

Dial your machine to the following settings:
(remember, you may need to tweak these settings to get the best results)
Right Needle: 5


I used regular serger thread to do my rolled hem. It does use up a lot of thread! For a cleaner look with more coverage, you'll need to get woolly nylon or Polyarn. What's the difference, you ask?? Woolly nylon apparently will melt if ironed. That can be bad! So far, I've used a rolled hem with shirring so I have to use an iron. The melting issue can be avoided by using Polyarn. Disclaimer: I haven't tried either of these out yet. I've just done a bit of research and am sharing what I've found via the interweb. Also, keep in mind that these threads will be used in both the upper and lowerloopers. You'll use standard thread in the needle.
Another random tip: try to start the machine off slowly and avoid sudden starts/stops. That helps keep that rolled hem looking nice and even.
Okie dokie. That's all I have for today. Go forth and serge ;) If you need more info or more photos, let me know! If something sounds totally crazy, definitely point it out as I had a toddler handing me cans of beans from the pantry while typing.
Oh! Stay tuned for a giveaway. I'm still working out the details but it should be a good one!
Upperlooper: 5.5
Lowerlooper: 8
Differential Feed: .7
Stitch Length: R
Stitch Width: 5
I used regular serger thread to do my rolled hem. It does use up a lot of thread! For a cleaner look with more coverage, you'll need to get woolly nylon or Polyarn. What's the difference, you ask?? Woolly nylon apparently will melt if ironed. That can be bad! So far, I've used a rolled hem with shirring so I have to use an iron. The melting issue can be avoided by using Polyarn. Disclaimer: I haven't tried either of these out yet. I've just done a bit of research and am sharing what I've found via the interweb. Also, keep in mind that these threads will be used in both the upper and lowerloopers. You'll use standard thread in the needle.
Another random tip: try to start the machine off slowly and avoid sudden starts/stops. That helps keep that rolled hem looking nice and even.
Okie dokie. That's all I have for today. Go forth and serge ;) If you need more info or more photos, let me know! If something sounds totally crazy, definitely point it out as I had a toddler handing me cans of beans from the pantry while typing.
Oh! Stay tuned for a giveaway. I'm still working out the details but it should be a good one!
Another great tutorial for the serger! I am scared about taking anything out (stitch finger) for fear that I won't be able to get it back on again. I will eventually try it, but until then, I'm happily making beautiful ruffles with my serger! Yipeee!
ReplyDeleteThis is a great tutorial! Did you teach yourself about sergers, or did you take classes? I just bought a Janome serger that does a rolled hem... I am kind of scared of changing the settings so I'm just having a ball overlocking everything in sight for now!
ReplyDeleteMan!!! I was so excited about this tutorial. I have this same machine and have had the hardest time getting the rolled hem to work.
ReplyDeleteBut...ugh.... I still can't get it to work with these settings. Man.
My thread keeps breaking in the lower looper.
Any ideas???
I set the blue to just above 7. Like a 7.25. Worked perfectly
DeleteYou really need to thread the right needle last. I was doing the same thing. You have to thread them in order.
DeleteThis is the greatest. I just got my machine this week and still do not know location of parts and your pictures were just the best. My stitch looks good. Practise will help. Thanks
ReplyDeletethanks for this, I used it to guide me in a nice test rolled hem on my new 1034D! I wonder, though, how do you handle ending the seam on a rolled hem on the serger, assuming you are sewing in a circle?
ReplyDeleteHey, Glayla!
DeleteI know this is super late in the game, but just in case it at least helps someone else....
I just took a class on my serger, and she taught us this trick on knitting circles or all the way around a blanket/napkin/etc.: When you get back to the start, clip your threads before you get there, then lower your upper cutter. Then finish out and taper off to the side. That way, you don't accidentally start cutting your already trimmed beginning area.
Now, that works in theory. I've only tried it once in class. :-) Give it a try, though!
glayla-I just overlapped a little and trimmed the threads. It's not very noticeable. You could always use a little fray check where you trimmed the threads also.
ReplyDeleteThank you so much! This helped me a lot. I've never been able to get the tension set right on 1034D. Your settings were exactly what I needed. The rolled hem looked great as well!
ReplyDeleteThanks so much for the tutorial. I'm still having my lower lopper thread come out when I serger/rolled hem. does anyone have any idea's?
ReplyDeleteThank you so much for this tutorial! I was having a horrible time getting the upperlooper thread to stay in the eye or the lowerlooper to stop breaking (same problem as Cole's and Amanda) but when I checked the settings on the left side of the machine, mine were set differently. That made the difference for me! Thanks again!
ReplyDeleteThis comment has been removed by a blog administrator.
ReplyDeleteI have been experimenting with a rolled hem for several months now and it was just not looking right. I tried your settings and it came out perfectly. Thank you! I found it just in time too, I just receive an order of knits that I bought on sale at fabric.com.
ReplyDeleteOh! Thank you! I wish I had found your blog before. I've had a hard time to find the settings to do this. I'll give it a try
ReplyDeleteYES! Thank you so much! My settings ended up being just a touch different - but they usually are, my cutter doesn't like working all the time, so that throws things off a little. Off to read your gathering tute - hoping that one works as well for me as this! :)
ReplyDeleteI fear taking the stitch finger out because I am not sure if I will get it back in. Is this hard to do?
ReplyDeleteHey Karen!
ReplyDeleteIt's actually pretty easy to put back. You just press the same lever you used to remove it to slide it back in. It might help to snap a quick photo before you take it out just so you have something to refer to :)
This comment has been removed by the author.
ReplyDeletesewocd,
ReplyDeleteso glad you found the tutorials helpful!!
Thank you so much for this tutorial! I'm helping a friend finish handkerchiefs for her dad, and this was just what I needed. The manual has instructions, but your pictures made it so much easier! Thanks again!!!
ReplyDeleteyou're a saint. this simple little tutorial has saved me much frustration. i couldn't get my numbers right...i appreciate those pretty rolled hems so much more now!! they look great thank you again!
ReplyDeleteThank You So Much! I have learned so much from your tutorials! I wasn't understanding the poor instructions and after following your amazing tutorial I got the rolled hem I wanted:) Please keep your site up, the wealth of information here is incredible. If everyone in the world was as nice as you to put this in plain english for everyone, life would be easier for everyone!
ReplyDeleteThank You So Much! I have learned so much from your tutorials! I wasn't understanding the poor instructions and after following your amazing tutorial I got the rolled hem I wanted:) Please keep your site up, the wealth of information here is incredible. If everyone in the world was as nice as you to put this in plain english for everyone, life would be easier for everyone!
ReplyDeleteWhat adjustment do I need to make so it isn't so tight? It seems like is is making the fabric shrink and is moving slowwwww. Is that normal?
ReplyDeletebizzybof3@gmail.com
YOU are awesome!
Awesome tutorial, thank you! I can't find my manuals and couldn't remember how to do the rolled hem, this solved my problem since the instructions aren't in the manual you can download! :)
ReplyDeleteTHANK YOU THANK YOU THANK YOU, and did I say THANK YOU/? I've been trying for a couple of years and spent a ton of time online searching for the perfect settings for a rolled hem! It has never turned out perfect UNTIL tonight when I tried with your settings listed here! I want to let you know how much I appreciate the time you took to share your knowledge with others! For those of you that said it didn't work, try changing your need (make sure it's the correct size) and make sure you're using the right thread. Maybe check your feed dog settings as well (my Brother is set to 2)
ReplyDeleteStacy
You absolutely rock! I've been trying to figure this out forever. I actually stopped even taking out my serger for a few months because the entire experience was so frustrating. Now I'm so happy. My cover stitch looks like a satin stitch (and yes, it does use a lot of thread, but it's still awesome!) I haven't tried your gathering tutorial yet, but I'm sure it's just as amazing. Thank you for this!
ReplyDeleteI had the same problem with the lower looper thread breaking. Finally, after many different efforts, I pushed the little white button behind the colored tension disks and blew really hard. Basically, the tension wasn't holding properly becasue of debris in the tension disk. Give that a try and then re-thread the whole machine
ReplyDeleteGreat tip! Thanks for sharing :)
DeleteThis is my first time trying out the rolled hem feature on my 1034D. I'm sewing on a sheer fabric and it seems like the stitches are too close together and I'm having trouble getting a straight line on my tests. Plus the hemmed part seems to separate from the fabric body so I have gaps and the edge bunches up and gets curly on the edge instead of being straight and pretty. What am I doing wrong? Thanks for all the information.
ReplyDeleteIt's actually been a few years since I've done a rolled hem on anything so I'm a bit rusty. I'm thinking your issues are related to the fabric you're using. You'll probably need to change the settings around some - maybe try increasing the stitch length. Here's a youtube video that might help:
DeleteAlso, make sure you're trimming off at least 1/4" fabric has you feed it through the serger - that may help make sure that the stitching doesn't separate from the fabric.
Sorry! Not sure why the link didn't post: http://www.youtube.com/watch?v=3jWJ6cKQvRw
DeleteIt sounds like it's your fabric. What kind of sheer material are your working with?
DeleteThanks so much for this! I've lost my manual and this was great!
ReplyDeleteThe whole manual is available online. I've found that I prefer to go to the PDF version on my computer rather than the paper version. Here's the link:
ReplyDeletehttp://www.kenssewingcenter.com/free-brother-1034d-serger-instruction-manual-p-30854.html
Thank you for the tutorial! I have a Babylock, but something is amiss with it and I had to pull out my 1034D this weekend as back up. Of course I couldn't find the manual and had only an imperfect memory of how to switch over to a rolled hem stitch. I set my lower looper tension to 5 as the thread kept breaking at the higher tension. I also folded my hem edge under by 1/4" and turned off the blade. As I was sewing on a pretty thin rayon challis, I needed the extra layer to make a nice finish. Turned out exactly as I wanted. Thank you!
ReplyDeleteThe stuff in this blog is in not only incredible but also providing the great knowledge to the people. herby coupon
ReplyDeleteIt really wasn't that bad!! I used the handy orange booklet that came with the serger along with the nifty diagrams on the machine, crossed my fingers, and hoped for the best. remalladora
ReplyDeleteThis comment has been removed by a blog administrator.
ReplyDeleteWhen one removes the left needle, does one have to unthread it from the machine as well? Or what does one do with the dangling left needle thread?
ReplyDeleteI unthread it!
DeleteThank you, Vanessa. That was what I thought to do so that the threads don't get tangled.
ReplyDelete