
I've got a quick and simple project to share with you today! Assuming you already have fabric/fusible interfacing/thread/etc it is also very inexpensive. Dig up some fabric scraps and then head over to your local craft store to pick up some basic jewelry findings. You'll also need some needle nose pliers and Fray Check.


I found the necessary jewelry findings at Hobby Lobby and Joann's. I'm sure Michael's carries this stuff too. I was able to get everything on sale for a few dollars per item. For about $6 {if the items are on sale or you use coupons}, you'll have enough supplies to make several bracelets. I should mention that the ribbon crimps come in various sizes...Hobby Lobby only carried one size which was just under 3/8" wide. I wouldn't try to use anything smaller than that. Joann's carries a multi-size bag which includes 3/8" and 3/4" wide ribbon crimps. You can also find the crimps on Etsy.

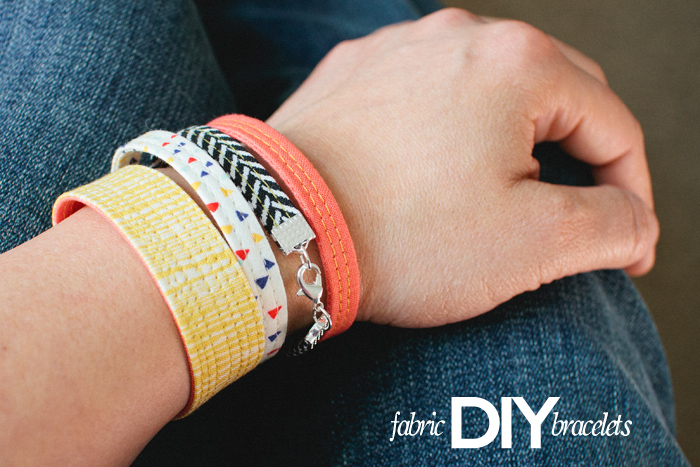
As noted on the photo above, you'll use the ribbon crimps to determine how wide to cut your fabric strips. I used a 1/4" seam allowance when making these so you'll want to add 1/2" to the width of the crimp. The interfacing should be cut the same width as the ribbon crimps. Cut everything the same length...whatever fits around your wrist minus the length of the clasp and jump rings. For example, my wrist is about 6" around so I cut my strips between 6" and 6.5" long to allow the bracelets to fit with a little wiggle room. If you opt to use different fabrics for the front and back, your bracelets will be reversible.

Center the strips of interfacing on the wrong sides of the fabric and fuse. Place your fabric strips right sides together making sure all the edges are lined up well. Sew along one side of the interfacing which should give you a 1/4" seam allowance. Press open the seam and then fold in the outer edges towards the middle by 1/4" - use the interfacing as a folding guide. Press everything into place and then fold the bracelet in half, wrong sides touching. I like to use small binder clips to hold everything in place. Sew closed the open side first then flip things around and sew along the other side. If you want to add additional rows of stitching, go for it! Using a straight edge and rotary cutter, trim the ends evenly and then seal them with Fray Check.


Once your bracelets are dry, gather up your pliers, crimps, jump rings, and clasps. Use the pliers to flatten the crimps onto the ends of the bracelets. I do this in steps to avoid denting the crimps. Pull on the crimps to make sure they're attached well. Then use the pliers to pull open the jump rings just enough to fit onto the ends of the crimps. Slide a clasp onto one of the rings, close up the rings, and you're all finished! Wear one bracelet or stack them up. These would make cute stocking stuffers or teacher gifts as well.


Cute bracelets! I was wondering if you had a source for lobster clips and clamps?
ReplyDeleteI bought mine at Hobby Lobby and Joann craft stores but you can also get them through Etsy. You'll find a link in the post :)
DeleteThanks for the quick reply! I'll check out Joanns. :)
Deleteno way!!!! seriously, get out! these are so freaking cool! I had no idea such jewelry hardware could be found. I'm making some!!!
ReplyDeleteSuper cute!
ReplyDelete-liZ
what a fantastic idea!!!!
ReplyDeletethese are brilliant!!
ReplyDeleteSo awesome!!!
ReplyDeleteThese are amazing Vanessa - I love how simple, yet pretty they are. And of course your photos make everything fantastic! Love them.
ReplyDeleteusing the proper jewellery findings really elevate these to another level of special! I love them, and I'm anticipating some happy crafting with my daughters pumping some out for all our friends and family!
ReplyDeleteThese are really cool and look simple enough to make. If I can find some ribbon crimps at the craft store, I'll make some to put into my sister's stocking!
ReplyDeleteVery cute!
ReplyDeleteoh these are way cute! fun way to use up scraps too. now to hit michaels for the hardware! :)
ReplyDeleteSo cute!!
ReplyDeletei bought some of those ribbon crimps recently and wasn't sure what to do with them-now i know :)
ReplyDeletethese look so cute!
Love these! I'm definitely making some for my nieces, my son and daughter, and all their friends! Great idea.
ReplyDeleteBrilliant idea! These are super cute. Thank you for sharing with everyone. These will make great Christmas gifts.
ReplyDeleteooh these are super cute! Want to see the washi one!! ;)
ReplyDeleteLove!Love!Love!
ReplyDeleteThese are awesome - my daughter and I will definitely be making some for her friends!!
ReplyDeleteGreat DIY !!! The market is clouded with a number of inexpensive stuffs and the world is to be shown that only rare metals do not bear the best designs and look...
ReplyDeleteCubic Zirconia Bracelet
These are fantastic! I have to try this myself using my vintage fabric scraps. You could possibly even make a more manly version.... hmmmm... you've got me thinking now! :D
ReplyDeleteThank you for sharing x
Great tutorial. I hope you don't mind that I shared this on Facebook. I own a bead store and we are sharing tips and ideas for the holidays. Our store carries ribbon crimps and all of the other findings that you call for, including new ones in antique copper and antique brass, so I think I might try this with ribbon and lace for a more vintage look. Thanks for the awesome inspiration!
ReplyDeleteShae at Sweet Beads
sweetbeadslv@gmail.com
I agree Shae about the bead shops. You'll find more variety, sizes, and usually have the option of buying just one of a kind at a bead shop. I'm going to change out a short strap for a long one on a cute little vintage clutch and couldn't get the findings I need at Hobby Lobby or Michael's. When I thought to check the bead shop, they have what I want for a total of 15 cents.
DeleteLove these little bracelets!
Jan
PKM sent me...way cute, think I found a project for this afternoon! Thanks for sharing.
ReplyDeletevery cute! your stitches are so perfect and i love the triangles.
ReplyDeleteI just made a few of these...sooo fun! Excellent instructions! Thank you!
ReplyDeleteGreat! I just whipped up a bunch for teacher gifts! Thanks!
ReplyDeleteA few thoughts:
1) Use a walking foot, if you have one. Super easy.
2) I thought the 6"-6.5" was too short. I made mine 7".
3) Variation- lengthen even more and use a button, instead of clasps. Of course, you gotta turn the edges under, too.
4) Using two different color fabrics can be tricky. I found that making them the same on both sides, or at least using the same background color, made then look nicer.
5) Use a different color bobbin thread to make variation between sides!
a button sounds like a good idea, too! I didn't do the greatest job with the jump rings, and have to be careful with them coming apart. Have since watched a tutorial on that very thing...helpful for the jewelry newbie :)
DeleteThese bracelets are just too great! I have a granddaughter who will be 14 in December and just know she'd like several. Went to JoAnn's this a.m. and couldn't find any of the tools needed for the bracelets. Will have to check out Hobby Lobby and Michael's this coming week.
ReplyDeleteThis is such a great idea and tutorial and I think I have all those findings...somewhere. Got to find it!
ReplyDeleteThank you for sharing.
This is such a great idea that my ASG (American Sewing Guild-Albany Chapter) wants to use these kits as favors for their Annual Fashion Show & Luncheon. The hardest part is finding the same size ribbon end crimps.
ReplyDeleteI used magnetic clasps since I have arthritis and can't handle the lobster clasps. Thanks.
I went over this website and I conceive you've got a large number of splendid information, Webspin UK
ReplyDeleteThey're very cute. A person might want to cover the fabric with iron-on plastic or Scotchgard them before attaching the jewelry hardware.
ReplyDeleteHappy Gurpurab
ReplyDeleteGuru Nanak Jayanti Images
Guru Nanak Jayanti
26 January Images
Hate Story 3 Zarine Khan
Hate Story 3 Hot Zarine Khan
Hot Zarine Khan in Hate Story 3